Photomanipulation Weekend
Here is the picture I did in 2012. (A very bad one, I must admit, I was a beginner):

Bad composition - lack of depth - light and shadows don't follow the main source of light (the sky light on the background), the center island should be against the light - horrible dark shadow on the right side (looking like a big dirty spot) - bright yellow color on the bottom left side of the picture catching the eye to the detriment of the main subject (the castles) - unatural light reflections, visibly painted, the water doesn't reflect the bright light of the background.
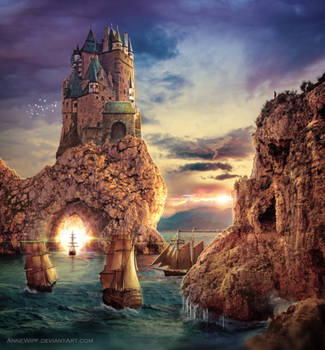
and here is the picture I did recently, using (more or less) the sames stocks:
 by annewipf")
As you can see below, the composition of the new picture follows the very simple rule of the 3x3. The main subjects are grouped in the lower left side of the picture, which gives importance to the beautiful sky, source of light, which gives depth and lightens the composition.

2. BLENDING
The first step for doing a photomanipulation, after composition, is to blend the stock pictures, using adjustment layers (curves, color balance, etc.) with a clipping mask on each stock picture separately, until you get the desired result. Never forget this step, even if it seems a bit tedious, it is the most important for a good result:


3. LIGHT AND SHADOWS
A useful tool, when one of the stock pictures is too contrasted, is the "Image">"Adjustments">"Shadows/Highlights" one. Adjust the shadows, but avoid adjusting the lights or your picture may become grayish. I used this tool to mitigate the very dark shadow on the picture of the main castle (left side).
There are several ways to add light and shadows in a picture. You may use the "burn" and "dodge" tools on a grey layer with an overlay mode, for example. The way I like the best (I think it is easier to control) is using curve adjustment layers with layer masks, to lighten or darken the parts I want to. I usually add or remove some yellow color on these curves, to give a sunny effect (more yellow on the light parts, less on the dark ones).
You may add some more yellow in the sunny parts of your picture (here, the grass on the background) using a "color balance" adjustment layer with a layer mask on the top of your layers.
Another way consists of copying and flattening the copies of all your layers (Shift-Ctrl-Alt-E) and adding some temperature and exposure in the "Camera Raw" Filter; then, with a white brush on a black layer mask, reveal the sunny parts.

4. DEPTH
The farther away a subject, the more desaturated it is (especially the yellow and red tones), and the father subjects also have a soft blur, called atmospheric blur, due to the dust particles floating in the air (reason why a landscape seems sharper after the rain: this one cleaned the atmosphere from its dust particles).
For the saturation, in this particular picture, the hills in the background already give this effect, so I changed nothing.
For the blur, there are 2 ways (I used both):
- If necessary, "Filter">"Convert for Smart Filters" (so, you'd be able to change your settings if necessary) and add a soft gaussian blur (max 2 pxl) on the farthest background and another softer (max 1 pxl) on the smaller
castle and rock.
- copy and flatten the copies of all your layers (Shift-Ctrl-Alt-E), "Filter">"Other">"High Pass", more or less 2pxl, overlay mode. Add a black layer mask and, with a large white brush, reveal the nearest parts of the picture: the foreground, the left side castle and hill.
To add some more depth feeling, you can heavily blur the very proximate foreground. On this photo, that would be the grass on the bottom left side . Then, copy the whole picture (Shift-Ctrl-Alt-E), "Filter">"Blur Gallery">"Field Blur". Add a black layer mask and, with a large soft white brush, reveal the bottom part of the picture.

5. REFLECTIONS OF THE BACKGROUND IN THE WATER
From the tutorial of Elissandro Pinto :
:
- Duplicate and invert the part of the image that appears in the reflection, position it above the image.
- Duplicate this layer.
- Add a white layer, use a uniform 50% noise filter. Go to Filters> Filters gallery>Sketch> Bas Relief. Then go to filters> blur> motion blur horizontal 70. Finally, Distort>Perspective. Save the result (under the name "lake" for example) in psd. Delete this layer.
- Back on the previous layer, filters> filters gallery> distort> glass, 12, 2, and, under "Texture", add your saved document ("lake"). OK.
- Add a layer mask and slightly erase the upper part of the layer.
- Return to the layer below and add a slight Gaussian blur.

6. LIGHT REFLECTIONS AND BOKEH
Now, we'll add the reflections of the bright sky in the water. For those, we'll use only the ordinary Photoshop round brush, with these settings:
- Bright wavelets: Soft white round brush, more or less 80pxl (for a 3000x2000pxl picture), roundness 8%, spacing 50, size jitter 100%, scatter 420%. Paint the wavelets as shown upper on a new layer, color dodge mode.
- Bokeh: Pick the green of the farthest grass for the color. Round brush, more or less 200pxl (for a 3000 x 2000pxl picture), roundness 100%, spacing 90%, size jitter 100%, minimum diameter 50%, scatter 190%. Paint the Bokeh on the bottom of you picture in color dodge mode.

7. FINAL SETTINGS
Add a thin white line on the parts of the buildings illuminated by the sun, add the birds, and add some adjustment layers on the whole picture until you get the required result. At the end, you can experiment with using very soft opacity layers of "gradiant map", "color lookup", photofilter, etc. and (I usually use all of these) curves, color balance, selective color (mostly the grey one), "black and white" on a luminosity mode, and vibrance.
Bad composition - lack of depth - light and shadows don't follow the main source of light (the sky light on the background), the center island should be against the light - horrible dark shadow on the right side (looking like a big dirty spot) - bright yellow color on the bottom left side of the picture catching the eye to the detriment of the main subject (the castles) - unatural light reflections, visibly painted, the water doesn't reflect the bright light of the background.
and here is the picture I did recently, using (more or less) the sames stocks:
Credits and links to the stocks used on the new picture I Ching 08 - Bi (Holding Together)
1. COMPOSITION
As you can see below, the composition of the new picture follows the very simple rule of the 3x3. The main subjects are grouped in the lower left side of the picture, which gives importance to the beautiful sky, source of light, which gives depth and lightens the composition.
2. BLENDING
The first step for doing a photomanipulation, after composition, is to blend the stock pictures, using adjustment layers (curves, color balance, etc.) with a clipping mask on each stock picture separately, until you get the desired result. Never forget this step, even if it seems a bit tedious, it is the most important for a good result:
3. LIGHT AND SHADOWS
A useful tool, when one of the stock pictures is too contrasted, is the "Image">"Adjustments">"Shadows/Highlights" one. Adjust the shadows, but avoid adjusting the lights or your picture may become grayish. I used this tool to mitigate the very dark shadow on the picture of the main castle (left side).
There are several ways to add light and shadows in a picture. You may use the "burn" and "dodge" tools on a grey layer with an overlay mode, for example. The way I like the best (I think it is easier to control) is using curve adjustment layers with layer masks, to lighten or darken the parts I want to. I usually add or remove some yellow color on these curves, to give a sunny effect (more yellow on the light parts, less on the dark ones).
You may add some more yellow in the sunny parts of your picture (here, the grass on the background) using a "color balance" adjustment layer with a layer mask on the top of your layers.
Another way consists of copying and flattening the copies of all your layers (Shift-Ctrl-Alt-E) and adding some temperature and exposure in the "Camera Raw" Filter; then, with a white brush on a black layer mask, reveal the sunny parts.
4. DEPTH
The farther away a subject, the more desaturated it is (especially the yellow and red tones), and the father subjects also have a soft blur, called atmospheric blur, due to the dust particles floating in the air (reason why a landscape seems sharper after the rain: this one cleaned the atmosphere from its dust particles).
For the saturation, in this particular picture, the hills in the background already give this effect, so I changed nothing.
For the blur, there are 2 ways (I used both):
- If necessary, "Filter">"Convert for Smart Filters" (so, you'd be able to change your settings if necessary) and add a soft gaussian blur (max 2 pxl) on the farthest background and another softer (max 1 pxl) on the smaller
castle and rock.
- copy and flatten the copies of all your layers (Shift-Ctrl-Alt-E), "Filter">"Other">"High Pass", more or less 2pxl, overlay mode. Add a black layer mask and, with a large white brush, reveal the nearest parts of the picture: the foreground, the left side castle and hill.
To add some more depth feeling, you can heavily blur the very proximate foreground. On this photo, that would be the grass on the bottom left side . Then, copy the whole picture (Shift-Ctrl-Alt-E), "Filter">"Blur Gallery">"Field Blur". Add a black layer mask and, with a large soft white brush, reveal the bottom part of the picture.
5. REFLECTIONS OF THE BACKGROUND IN THE WATER
From the tutorial of Elissandro Pinto
:- Duplicate and invert the part of the image that appears in the reflection, position it above the image.
- Duplicate this layer.
- Add a white layer, use a uniform 50% noise filter. Go to Filters> Filters gallery>Sketch> Bas Relief. Then go to filters> blur> motion blur horizontal 70. Finally, Distort>Perspective. Save the result (under the name "lake" for example) in psd. Delete this layer.
- Back on the previous layer, filters> filters gallery> distort> glass, 12, 2, and, under "Texture", add your saved document ("lake"). OK.
- Add a layer mask and slightly erase the upper part of the layer.
- Return to the layer below and add a slight Gaussian blur.
6. LIGHT REFLECTIONS AND BOKEH
Now, we'll add the reflections of the bright sky in the water. For those, we'll use only the ordinary Photoshop round brush, with these settings:
- Bright wavelets: Soft white round brush, more or less 80pxl (for a 3000x2000pxl picture), roundness 8%, spacing 50, size jitter 100%, scatter 420%. Paint the wavelets as shown upper on a new layer, color dodge mode.
- Bokeh: Pick the green of the farthest grass for the color. Round brush, more or less 200pxl (for a 3000 x 2000pxl picture), roundness 100%, spacing 90%, size jitter 100%, minimum diameter 50%, scatter 190%. Paint the Bokeh on the bottom of you picture in color dodge mode.
7. FINAL SETTINGS
Add a thin white line on the parts of the buildings illuminated by the sun, add the birds, and add some adjustment layers on the whole picture until you get the required result. At the end, you can experiment with using very soft opacity layers of "gradiant map", "color lookup", photofilter, etc. and (I usually use all of these) curves, color balance, selective color (mostly the grey one), "black and white" on a luminosity mode, and vibrance.