ShopDreamUp AI ArtDreamUp
Deviation Actions
... and how to correct them.

Credits and links to the stocks used on the new picture I Ching 05 - Xu (Waiting)
I was a bit ashamed about this picture done in 2012 and chose to redo it entirely (with another house, due to the removal from dA of the first one). But what were the main mistakes and how can we correct them?
Here are the faults which immediately grabbed my eyes:

In 2012, I didn't master the adjustment layers and I tried to blend the pictures together using a full of colored layers (colors picked on every source layer) on a soft light mode: it may be a solution sometimes, but it often gives a bad result as we can see here: The foliages are too yellow compared to the rest of the picture; the house looks like a visible collage; the pixels are deteriorated and the whole picture looks unnatural, with an ugly greenish color.
I removed all these layers and lowed the opacity of the lights over the windows:

Then, I did some adjusments on every original layer, with one or several adjustment layers ("curves", "color balance", "hue/saturation", "levels"...), until I got the desired result (already better, isn't it?):

To give some deepness to the picture and a cleener look, I used a high pass filter in an overlay mode, with a layer mask to remove the most distant areas of the picture. Then, I duplicate and merged all the layers (Ctrl/Shift/Alt/E), add a gaussian blur of 15pxls, a black layer mask and, with a soft white and large brush, add some blur at the bottom and the bottom corners of the picture.

Then I darkened softly the picture. This tutorial may help you to understand the way I used: HOW TO CREATE A NIGHT FROM DAY SCENE.
Here, I used the "Selective Color", "Hue/Saturation" and "Color Lookup - Foggy Night" (opacity 30%) adjustment layers, with a layer mask on the windows to reveal the lights.

I duplicate and merged all the layers (Ctrl/Shift/Alt/E), Transform > Flip vertical, add a black mask and reveal the wanted parts with a soft white brush, and added some motion blur 90 deg. On a separate layer, with a small yellow pale brush, I added some lights in the windows.

I added the rain on a black layer, mode screen, using Filter>Pixelate>Mezzotint and a vertical Motion Blur. On a separate layer, I added a vignette (darken the corners).
Then comes the most artistic (and pleasant) part of the work. I added the sun texture (purchased on InkyDeal), screen mode, and, to give more rain feeling, I painted some bokeh and some other ones with a vertical motion blur, and - with the same method as described on 2. - added a large irregular blur, except on the middle of the picture.
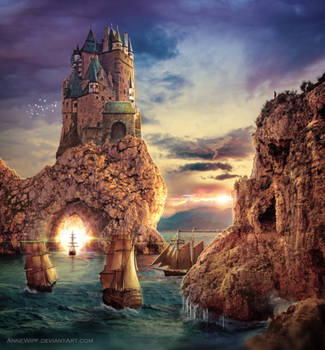
Here is the result, after a few final adjustments.

Credits and links to the stocks used on the new picture I Ching 05 - Xu (Waiting)
I was a bit ashamed about this picture done in 2012 and chose to redo it entirely
(with another house, due to the removal from dA of the first one). But what were the main mistakes and how can we correct them?Here are the faults which immediately grabbed my eyes:
1. BLENDING
In 2012, I didn't master the adjustment layers and I tried to blend the pictures together using a full of colored layers (colors picked on every source layer) on a soft light mode: it may be a solution sometimes, but it often gives a bad result as we can see here: The foliages are too yellow compared to the rest of the picture; the house looks like a visible collage; the pixels are deteriorated and the whole picture looks unnatural, with an ugly greenish color.
I removed all these layers and lowed the opacity of the lights over the windows:
Then, I did some adjusments on every original layer, with one or several adjustment layers ("curves", "color balance", "hue/saturation", "levels"...), until I got the desired result (already better, isn't it?):
2. SHARPEN AND BLUR
To give some deepness to the picture and a cleener look, I used a high pass filter in an overlay mode, with a layer mask to remove the most distant areas of the picture. Then, I duplicate and merged all the layers (Ctrl/Shift/Alt/E), add a gaussian blur of 15pxls, a black layer mask and, with a soft white and large brush, add some blur at the bottom and the bottom corners of the picture.
3. DARKEN
Then I darkened softly the picture. This tutorial may help you to understand the way I used: HOW TO CREATE A NIGHT FROM DAY SCENE.
Here, I used the "Selective Color", "Hue/Saturation" and "Color Lookup - Foggy Night" (opacity 30%) adjustment layers, with a layer mask on the windows to reveal the lights.
4. REFLECTIONS
I duplicate and merged all the layers (Ctrl/Shift/Alt/E), Transform > Flip vertical, add a black mask and reveal the wanted parts with a soft white brush, and added some motion blur 90 deg. On a separate layer, with a small yellow pale brush, I added some lights in the windows.
5. FINITIONS
I added the rain on a black layer, mode screen, using Filter>Pixelate>Mezzotint and a vertical Motion Blur. On a separate layer, I added a vignette (darken the corners).
Then comes the most artistic (and pleasant) part of the work. I added the sun texture (purchased on InkyDeal), screen mode, and, to give more rain feeling, I painted some bokeh and some other ones with a vertical motion blur, and - with the same method as described on 2. - added a large irregular blur, except on the middle of the picture.
Here is the result, after a few final adjustments.
Good Bye
After 20 years of struggle, my breast cancer will finally have won. I only have a few weeks left in front of me: I won't be very present here now, too tired. Also, I bid you farewell while I still can and hug you very hard. I love you. Anne
Apologies
I'm very tired and I'm affraid I'll not be so active in dA than I was. Just get a look occasionally. So, please excuse me if I don't give birthday wishes, nor thanks for supports and watches. But I still love you. :hug:
Health news
I hesitated to publish this journal, but I think you may know why I'll not participate anymore to contests, nor accept commissions or proposals, and encourage you to download all the stock images you may need afterwards. Here is the answer to all your questions.
After a twenty-year struggle against a breast cancer (not so bad), I entered the term phase: an invaded lung and the liver is affected.
My days are now numbered. How many ? I can't know. I'm tired, but I'll still fight and create, it is the less I can do.
When I'll die, deviantArt will probably close my accounts.
This is the reason why all my stock pictures including premade backg
Lack of inspiration
No inspiration for weeks. When, by some miracle, an idea comes to me, I find it bad before I have even finished gathering the stocks necessary for its realization. And when I persist, the result is really zero. It looks like the source has dried up. :(
Featured in Groups

© 2017 - 2024 annewipf
Comments17
Join the community to add your comment. Already a deviant? Log In