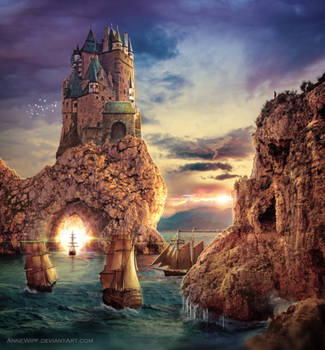


The first picture is an example from what we can often see in beginners’ works. This ugly effect is due to 2 mains mistakes: the lack of settings BEFORE the change of light and the use of a single folder (here a blue folder on a multiply mode) to do the change from day to night. This tutorial will show you how to give a natural aspect to this change.
1. ADJUST THE COLORS OF ALL THE ELEMENTS TOGETHER, BEFORE CHANGING DAY TO NIGHT
It is a current mistake to imagine that the change from day to night will be enough to blend the layers together and that it is not necessary to do this work. This is wrong: if you do not do this work, the lack of blending will still be visible after your changes. But you do not need at this stage to get a blue night effect, just to blend all the elements together. This is an example of what I did here (of course, you may choose other tones, it doesn’t matter):

For doing these settings, I use the Curves adjustment layer (the Levels adjustment layer is fine too) with a clipping mask ON ALL THE LAYERS SEPARATELY and set all the colors. It doesn’t take so much time and it is the secret for a good blending.
2. USE A FILTER SOFTLY
The heavy use of a single colored layer or filter on your work will give ugly results: uniformity, lack of natural and, sometimes, color aberrations or noise. My other secret to get a good result: a lot of settings used softly, instead of a heavy one.
A filter I find very useful for changing day to night is the “Color Lookup > NightFromDay” one, which gives a quite natural effect if it is used with a soft opacity (50% max). It is a good base for the next operation: revealing the lights. 
Put the filter over your layers with a full opacity, add a layer mask and, with a soft round brush, remove the filter effects on the windows and a bit around them (for the reflections on the walls). Then, law the opacity of the filter to 50%.
3. DO MULTIPLE COLOR ADJUSTMENTS
- Color balance adjustment layer. Then, remove the layer mask, go to the layer mask of the Color Lookup filter, Select>Load Selection to copy the mask and paste it on this layer, to reveal the lights. Redo this operation on all the next adjustments and/or filters.
- Selective color adjustment layer (don’t forget to change the grey tones, this option is very useful)
- Duplication of all the layers (Ctrl+Shift+Alt+E), low opacity (less than 30%) mode multiply.
- Eventually, cold photo filter layer. Etc.
4. ADD SOME LIGHT
- Add a blue color on separate layers over the background, mode multiply and mode screen, to add some light and shadows (here I mostly added some light on the left side of the sky, and shadow on the right side)
- Open a new layer over the other ones, fill it with a soft yellow color, mode screen, copy and inverse the mask used previously, and paste it. Then, low the opacity to 50%.
5. SOFTEN THE LIGHT
- Add a new layer, normal mode, very law opacity (10 to 30% maxi) and fill it with a complementary color from the main blue color (here: a dark brown). Adjust it with the hue/saturation adjustments, until you get the desired effect.
- Add a new layer, overlay mode, same very law opacity, and fill it with the main blue color.
6. ADD SOME HIGHLIGHTS
- Add a new layer, color dodge mode, and add some highlight with a pale yellow color on the windows as shown here.
7. PROXIMATE FOREGROUND
To add some deepness to the picture, add some elements on the foreground (here: the branch and the barbwire), multiply mode. Eventually, if their background is still visible, adjust their Brightness/contrast. Blur them heavily.
STOCK USED:
annewipf.deviantart.com/art/Au…
annewipf.deviantart.com/art/Sk…